1


Amen!Originally Posted by typeone

Ride, Ride and more Ride!
need some Hop-Ev this season ... been too long
Beta 200RR
Will all this bling fit on a shiny new 200RR?
Doing the work over the winter is the smart thing to do anyway. I go in to the winter thinking I should do a few things, but by mid-winter it's off the radar.
Shoulder's mostly good besides the occasional pop and random cringeGuessing the first time I ride it's going to be sore. Hoping things dry up soon. There's a harescramble in a few weeks in eastern CT. Not sure I'm in the right shape for it right now though.
nedirtriders.com
Magic 8 Ball says, Start Fresh 2020
Beta 200RR
if i didnt bring it in id get nothing done. hate working in the cold.
awesome on shoulder but yeah, take it easy
hare scramble? shit, i will be lucky to be able to navigate dirt roads, hahaa. feels like i havent ridden in years. gotta up the training routine asap.
Beta 200RR
Great news on the shoulder
Those pops and cringes never go away man.
- - - Updated - - -
Hellz Ya!
man in Brown stopped by ... Fastway EVO 4 SS, delishus

Beta 200RR
Gorgeous!
FREE $10 UBER CREDIT W' PROMO CODE --> PON41
1994 Yamaha YZ250 CA Street Legal 2-smoke :smoke:
I was looking at buying a set of those.
Real nice
yeah, great pricing on the stainless version and they'll last forever ... also transfer to the 200RR (wink, wink)
Beta 200RR
as usual, got buried with work but the machine is alive and kicking ... for the most part
- cleaned and replaced the weeping CS seal + spacer
- dug into the linkage bearings ... oh, Daddy, why you hate me so?
- no worries, baby. i gots you
- so fresh n' so clean
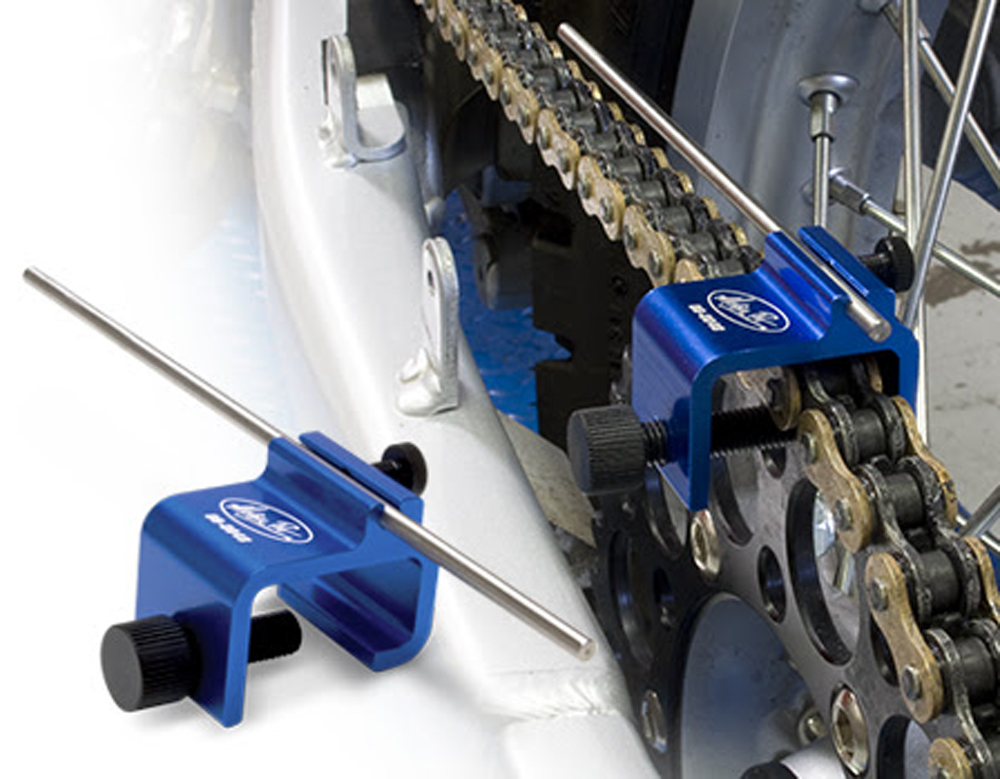
- diggin' the Beta chain adjustment block (left) + MotionPro alignment tool (right). a win for Old Man Eyes
- cheapo Tusk rear brake clevis wore out and got sloppy, Fasst clevis to the rescue. super tight, zero slop.
- scored a Scalvini full carbon silencer for cheap monies, but it had issues...
- fixed the busted core, repacked + polished. looks nice ... but it almost went missing the first ride. hmmm
SO...
issues during / after yesterdays ride
- linkage is fucked, it's binding at the knuckle > swingarm union. the rear end won't return smoothly after pushing down on the seat. i've ordered all new bolts, nuts and bushing for the swingarm. gotta be worn. the bolt for that link was real nasty, decent gouges, fingers x'd after FULL replacement all is well. we loosened all bolts and lightly torqued half-way through ride, way betterer.
- +35mm shock travel / +1in ride height made the bike TALL. i need to dial this new setup in and get used to it. the added travel and ground clearance will be welcome, but it's a big change for sure
- Scalvini silencer almost escaped, gotta Loctite the single (rather than dual) mount point and hope she stays put. it sure does look purdy
- cleaned up a bunch of bolts with a die kit but didn't re-Loctite, almost lost an EE hand guard
- fork action with larger air gap and lighter oil was hard to tell if a change for the better. need to dial in the chassis.
- the DRC Sag Tool is a pretty nice bit of cheap kit, allows for 1-man sag adjustment. recommend.
Beta 200RR
"Chain adjustment block (left)"
I either have the "old man eyes" or am just slow. Both probable at this time. What's the adjustment block about? I think I see something rammed under the bottom of the swingarm.
I saw a cat on the FBs who was 3d printing adjustment guides for KTM. He was showing off, but not sharing the recipe. Claimed he had custom measured a bunch of KTMs and come up with his design. But it was printed with a $300 3d printer. Nothin' special.
I kind of want to build & print one myself.
yeah, not a great pic ... you could easily 3D print both tools ... the block basically replaces the 'three finger slack' measurement by wedging a block into a slot on the underside of the chain slider. then with the alignment tool attached to the sprocket, it makes all your alignments quick and easy.
wedge block in > screw out left axle block adjuster until the chain is tight > screw out right axle adjuster until the aligment tool is in line with chain > done.
i used to use a little millimeter ruler to measure from the back of the axle adjuster blocks to end of swingarm but i cant fucking see the numbers anymore.
both tools were fairly cheap, ~$15 ea.
adjustment block
alignment tool
speaking of 3D printing, wish i had a printer to make a rebound adjustment tool for the MXT cartridges i'm running. they use a 5mm hex in the cap but it's almost impossible to get an allen in there due to the bars cramping space. hard to get clean clicks ... a shorty allen + round, knurled knob would work mint.
Beta 200RR
figured out my linkage binding issue ...
OEM bearing is 30mm long in one of the links, Factory Links uses two bearings in place of the single. while emailing with them about my issue they said they use 2 x 16mm bearings to replace the 32mm OEM ... as you can see by the pic, that won't work in place of the OEM 30mm, it jams the whole assembly up. the Factory Links rep corrected himself and said there should be 2 x 15mm bearings ... so, i either installed the 15mm bearings in the other link, or my kit only had 6 x 16mm bearings. i thought they were all the same. they are overnighting the 15mm bearings free of charge.
sucked to miss out on Saturday's ride, weather was beautiful, but i'm glad i didn't put more time on the frozen link. the collars were scored from non-movement.
i threw an old 30mm OEM bearing in there for now but i'll pull it apart again when the replacement bearings and new bolts/nuts arrive.

Beta 200RR
yikes! glad you caught that!
FREE $10 UBER CREDIT W' PROMO CODE --> PON41
1994 Yamaha YZ250 CA Street Legal 2-smoke :smoke:
yeah, was driving me nuts trying to figure out where the issue was. back end felt so wrong. on the bright side, i can rip the linkage fully apart in no time flat now
Beta 200RR
fixed the linkage and dialed in rear sag. dig it.

Beta 200RR
I put my knobbies on...
Paul_E_D
How freaking satisying is this thread!?
Glad you got it out there and got it dialed in! Just as fun to see it ridden as working it
I've been playing with sag lately trying to find out what I like and I'm really jealous of your adjuster right now. I assume you measured it to set it in the ballpark, and now adjusting based on feel?
nedirtriders.com
yes, usually i do that on occasion for feel (weight fluctuations more than anything) but the reason for this particular round of tuning was due to the work i had done over the winter. shock travel was increased by 35mm to better balance the chassis (Betas have less travel than other bikes) and use more of the overall stroke.
with the increased travel i'm able to run around ~105mm of race sag vs the 96mm max i was running previously. the bike also gained an inch in ride height. i've been playing with fork tube height at the same time to compensate for the changes out back.
once you tweak sag enough, you will def get a good feel for what you like and don't like in different terrain. (assuming your springs are correct for your weight)
and you're right, that XTrig preload adjuster is a godsend when you want to make fast edits. especially if you have a battery powered drill with you
Beta 200RR
thanks, man! i'm still fine-tuning but def closer than the last ride ... i'll prob get it dialed on Sunday ...
then will have to change it all for Southwick the following wknd.
Beta 200RR
Take good notes!
Paul_E_D
yup, after every change i've been noting specs + general feel.
running the Golden Fatty front throws another wrench in the mix, sucker is tall. may try the 90/90 next rather than the 90/100 to get the front end down some. i had the triples at the 3rd line ever since first mounting but i tried 2nd line last two rides due to rear tweaks. may go back to 3rd rather than jack rear sag. i lost a TINY bit of feel/traction when i wound up the preload a bit. with a hair more sag, the rear felt super sticky over shit trail. never felt that before!
Beta 200RR
 Posting Permissions

 Reply With Quote