
0


Buy this
https://woodcraft-cfm.com/collections/servo-buddy
Don't bother doing anything to the exhaust. That Akro is the shit. Just going to get damaged when you crash again. Lol
14 Triumph Street Triple R, 18 TM 450SMX sumo, 15 Husky 250SXF tard, 14 KTM 250SXF and Cole's Grom
LRRS/CCS #66
Thank you to my sponsors: Sidi / AMSOIL / Klutch Industries

What about the exhaust guards that Justin Landry made years ago? Mine seemed to hold up pretty well.Originally Posted by sdog30

-Christian LRRS/CCS HasBeen ECK Racing
2011 Pit Bike Race CHAMPION!
I was chatting with him just yesterday. I saw him at the track last season he said he wasn't making those and hasn't been for quite a while. Maybe I'll see if he's willing to provide some sources for materials.
It appears Akra end caps are available.
Sam - the EXUP error codes can be eliminated for a few dollars in components and 30 minutes of time. I'll put the $70 towards sliders instead
I seem to remember the exhaust slider was a big hose clamp with some braided hose. You run the clamp through the hose and then around the exhaust.
14 Triumph Street Triple R, 18 TM 450SMX sumo, 15 Husky 250SXF tard, 14 KTM 250SXF and Cole's Grom
LRRS/CCS #66
Thank you to my sponsors: Sidi / AMSOIL / Klutch Industries
I don't think the hose was braided.
-Christian LRRS/CCS HasBeen ECK Racing
2011 Pit Bike Race CHAMPION!
This:
https://www.homedepot.com/p/UDP-3-4-...4005/304185201
- - - Updated - - -
I guess it's braided vinyl tubing
14 Triumph Street Triple R, 18 TM 450SMX sumo, 15 Husky 250SXF tard, 14 KTM 250SXF and Cole's Grom
LRRS/CCS #66
Thank you to my sponsors: Sidi / AMSOIL / Klutch Industries
Huh. I guess I couldn't see the braid under the paint. Never saw any evidence of braiding when I crashed that I can remember.
-Christian LRRS/CCS HasBeen ECK Racing
2011 Pit Bike Race CHAMPION!
Anyone have pics of an Ohlins steering damper installed on the top triple?
I am seeing ever so slight contact with the damper and the nut on the top triple. Thinking I'll have to shim that up a bit to get some clearance...?
My DIY EXUP eliminator will hopefully be installed today. $12 in parts and my friend who ordered the parts already soldered everything, it's just a matter of driving over there.
Steering damper shimmed.
EXUP eliminated.
Got a few things remaining on the checklist but this dog is just about ready to hunt!
Welp, as with many things, the to do list had some add-ons.
Things started simple, check wheel bearings, bypass EXUP, shim steering damper and reroute a couple things.
That has now turned into the above list plus:
Rebuild forks
Bypass AIS
Clean injectors (x8)
Fork seal kit should arrive Thursday, AIS is bypassed and I just finished up with injector cleaning.
I decided to make an injector cleaning rig to help things along and the spray pattern on 3 injectors improved significantly, which I was surprised to see considering they looked pretty decent already.
Hopefully getting to the smaller items soon....ordering sliders, checking fasteners, safety wire.
It all started because I saw a bit of blueing on the stanchions which somehow inspired me to clean the injectors. Doesn't make sense to me either!

This is good advice.
Paul_E_D
put jack stands under your rearsets and go to loosen your axle nut. if you get movement, your bearings are loose and need to be replaced.
people have their shock serviced 1-2 times a year, but never remove 2 more bolts to check the linkage bearings.
There isn't play to speak of in the linkages and swingarm but since it's been said I'll pull everything apart preemptively and clean/ grease. Front end is pretty much already off so addressing the head bearings won't be a big deal either.
Injector cleaning was rigged up using a battery and a couple alligator leads. Attaching to the injector inlet was done using a shortened straw and a modified vacuum cap connected to the spray can. Yes, I get it... it's not a whole lot of pressure compared to a dedicated machine. The injector cleaning was more about checking the o-rings and ensuring the spray pattern was uniform.
They are definitely nice. Maybe next season's budget. For now I'll hang it just like all the others.
Anyone have a fork spring compressor to borrow? Having a bit of a challenge making a homemade version
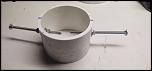
Drew some inspiration from the online DIY crowd. Ended up with 4" dia Sch40 PVC pipe, some nuts, washers and a pair of carriage bolts.
I'll use a ratchet strap through the axle hole to compress.
Posting now so if you don't hear from me again, you'll know how it turned out.
I tried the PVC/Carriage bolts thing and ended up borrowing some tools from my buddy. Just couldn't get it to work well for me. Don't those bolt ends need to be shaved down to a point?
There's a collar on top of the spring with a couple holes in it. Carriage bolts slip right in there. If I had to go directly on the spring to compress it I'd likely purchase the proper setup but with how rigid the schedule 40 PVC is and the ability to crank down on the hardware to keep the carriage bolts from moving, it's feeling like a pretty stout setup.
In the video below you'll see the Australian Peter Kates and at the 3:00 mark, the collar I mentioned earlier.
Why not a piece of black pipe or something else metal? Also seems like you could just put a piece all thread through the holes with with some nuts to keep it all from moving and bind the straps. Or, ya know, get... a couple... of guys... sorry.
-Alex
I can resist everything but Pete's mom.
The holes aren't passthrough. Damping rod runs down the center of everything. I'm all for ideas so can you describe more about the use of the black pipe? I'm not picturing it.
All that needs to happen is to get the collar low enough to clear the jam nut under the fork tube cap. I'm home free once that's loose.
EDIT: DIY spring compressor FTW! Took 3 whole minutes to compress the spring and remove the cap. I'll get a few pics up when I start on the other fork leg.
The 4" pipe could be a smaller diameter for sure. It's a little cumbersome to use but it works for now and it's all I had. I'll make a better setup after the fork service
Last edited by butcher bergs; 03-27-22 at 08:48 PM.
I'm confused. Can't you just pull the spring down by hand and slip the 19mm on the jam nut?
Paul_E_D
Ohh ok. I thought you could go straight through. I was saying black pipe as opposed to PVC but that seems to be not needed. Nice work.
-Alex
I can resist everything but Pete's mom.
 Posting Permissions


 Reply With Quote
