


0


I have been dying to get rid of that bulky 1st gen combination throttle assembly & switch pod and liked the way the 2nd gen is set up. So, I sent my old throttle assembly and cables to MotionPro to have a custom set made. Cost was $99, shipped for the throttle assembly and cables.
Here is the 1st gen setup:
And the custom setup by MotionPro:
And the 2nd Gen switch pod:
The challenge here is that the 1st Gen switch pod has the opposite end plug as the 2nd Gen. They both use the same plug, just put in backwards. (2nd Gen on the left, 1st Gen on the right.):
Luckily, thanks to my Michael (Painfully Slow), I am now bypassing the ignition and the rest of the lighting wiring is useless to me anyway, so I really only need to crimp 3 wires, the Orange & Black (one side of the stop switch) Yellow & Green (one side of the start switch) and Orange & White (the common between the stop and start switches). And as luck would also have it, both generations use the same wire colors for the stop and start switches.
I will also need about 6" more wire, since the 1st Gen's wiring harness is a little longer.
There really wasn't much to it. I clipped about 6" of wiring off of the 1st Gen switch pod, including the connector and spliced the Orange & Black, Yellow & Green, and Orange & White wires together on each end and capped off the rest.
As mentioned above, since I am now bypassing the ignition switch and running a total loss electrical system, I don't need the rest of the wiring. I will be cleaning up the unnecessary wiring over the winter to save some weight.
It took some work to get the new throttle assembly and cables to work with the 2nd Gen switch pod and my Accossato radial master, but eventually, I got it to where it operates smoothly and twists and returns nice and easy.
It's also just over 1/4 turn from stop to stop, which is significantly less rotation than the stock 1st Gen with an R6 throttle tube.
Another thing crossed off the list for the off-season. Photos of the assembly and connections at either end:

CCS/LRRS Expert#39, retired | Tony's Track Days, Instructor #11, retired
|

Lookin good, Chuckles.
But... just OVER 1/4 turn? You mean just UNDER 1/4 turn?
Think mine's a little less than 1/5th.
-Pete
NEMRR #81 - ECK Racing
Cyclesmith Track Days
Woodcraft | MTag-Pirelli | OnTrack Media
'03 Tuono | '06 SV650 | '04 CRF250X | '24 Aprilia Tuareg
NO, I mean just over. It's a 95 degree turn from stop to stop. 1/5 is 72 degrees and less of a turn than 1/4.Originally Posted by OreoGaborio

Supposedly, the R6 tube with the stock assembly was supposed to give somewhere between 1/5 and 1/4. Instead, mine seems to be a lot more than 1/4. It definitely had more throw than any of the other SVs I have taken for a ride.
CCS/LRRS Expert#39, retired | Tony's Track Days, Instructor #11, retired
Odd....
I like short throw... I went with an R6 tube, then stuck a zip tie on the cam with super glue to make it even shorter... it's held up for two seasons now and the throw is super short
-Pete
NEMRR #81 - ECK Racing
Cyclesmith Track Days
Woodcraft | MTag-Pirelli | OnTrack Media
'03 Tuono | '06 SV650 | '04 CRF250X | '24 Aprilia Tuareg
I did the same. Works great
CCS/LRRS EX #226
LOW DOWN RACING
Current stable:
2008 hyper 1100
2007 crf450r
2009 yz450f
2008 sikk mx 125 minimoto
if Chuck did things the easy and normal way, then he would need a new excuse to make a ton of NESR, BoRN, SVrider, and Facebook posts about "fixing" his race bike
I ran into that same connector problem on my 929. I had damaged the starter button inside the housing in a crash and replaced it with a Domina starter button and EuroRacing throttle. But then my headlight when out and I found some corrosion on one of the contacts but that didn't fix it. so I figured I'd get a stock one but mistakenly thought the 954 was the same but the connector is opposite like yours. so dumb.
LRRS Am #331
Graphic Tailor / Woodcraft / Armour Bodies / Suomy / Cycle Performance Autobody / Shorai / ChickenHawk Racing
I started reading through Lou's build thread and got me thinking tht I really don't need the right-side switch pod. I made a trip over to Needham MA where you can find You Do It Electronics, which has an awesome selection of switches. I opted for all toggles. Two on/off for the ignition bypass and kill switches, and one momentary on switch for the start button.
The good is that my SV's former life was a naked model, which means it already has the holes drilled for the switches. I am going to have to drill out the small upper hole, above where the ignition used to be, for the ignition bypass switch, since the lower center hole is too close to the steering head to mount a switch:
Unfortunately, the underside of the holes is not flush with the underside of the triple, so I can't mount anything until I have it milled down. The switches aren't long enough to go all the way through the holes in their present state. I may go ahead and have the two original ignition mounts milled down as well:
So, I did go ahead with setting up the wiring. I removed the right-sire switch pod:
And rewired the plug from it to 3, 14 gauge (yeah, I know, overkill) wires and ran them up to where the switches will be mounted. These are butted to the Yellow & Green, Orange & Black, and Orange & White, as was butted before into the switch pod. (note the heat-shrink wiring with the 3 orange wires sticking out of it and yes, they're marked with which wires from the plug they are butted to):
I also shortened up every unnecessary wire to be at just the length of the steering head. I will be going through the rest of the bike, removing all of the non-essential wiring later in the off-season, when I can get the bike over to Michael's house. All that is left out of the stock harness longer than the triples is 3 wires: a red from the hot side of the ignition, a Black & Yellow, which is the tach lead, and a Black & White, a ground for the tach (note the stub of wires, which are all capped off temporarily):
And finally, my schematic. It was a quickie job, but it does the job. It does not show the 100ohm resistor, since it is put into the system elsewhere. (near the ECU):

Last edited by The Snowman; 11-25-11 at 07:49 PM.
CCS/LRRS Expert#39, retired | Tony's Track Days, Instructor #11, retired
why go easy when complex saves weight and makes the overall bike less complicated?
BTW, talk to me when you can keep up with my on your middleweight bike.Now go away and leave my thread alone.
What's funny is that Jim checks all of those sites to see that I have posted there. And 1) he doesn't own an SV and 2) he doesn't post on BoRn.
Last edited by The Snowman; 11-25-11 at 07:37 PM.
CCS/LRRS Expert#39, retired | Tony's Track Days, Instructor #11, retired
Chuck, I'm not on BoRN or SVrider, and have never visited either.
I just assumed (and I'm probably right) that you put a thread like this on everything.
It's a nice upgrade but like Pete said, it's probably easier and more beneficial to do what he did.
Turn all these bike forms into your personal blog, I don't care. I'm just pointing out the obvious.
Point taken. I figured that someone else may benefit from this, should they decide to do the same.
CCS/LRRS Expert#39, retired | Tony's Track Days, Instructor #11, retired
Welcome to the internet.
I have no interest what so ever in this set up, but someone somewhere might. Hell what is different between this and a write up on how to change a rim? or a valve check?
Well, I got the triple back fro Lou today and put it all together. With the way I set the switches up, it's not as neat as I would have liked it to be, but it works great!
The 3 switches are now mounted on the triple. At the top center is what used to be the ignition switch. I need this, as the tach runs off the battery and I'm afraid that if I didn't put it in, it might slowly drain the battery. Having spent close to $400 on new batteries (2 Shorai Lithium Iron Phosphate batteries; one as a backup, just in case) and a Shorai charger, I don't want to end either batteries life any sooner than it should.
The left switch (if you were seated on the bike) is the kill switch and the right is the started switch.
And a much better schematic (remember that I have the 100 ohm resistor wired near the ECU, so it is not reflected in this diagram):
A better shot of the clipons sans switch pods and the new ignition, kill, and start switches.

CCS/LRRS Expert#39, retired | Tony's Track Days, Instructor #11, retired
looks good but you should label them.
LRRS Am #331
Graphic Tailor / Woodcraft / Armour Bodies / Suomy / Cycle Performance Autobody / Shorai / ChickenHawk Racing
Hell, I'm in just for the half assembled bike porn.
Blog on doode.
Nice work. Not something I would do(cuz I be lazy) but I can appreciate the work done.
I'd rather read about mods like this than 6 pages of "will my Corrola be able to pull this trailer".
Last edited by Charlief; 12-04-11 at 08:14 AM.
Me no likey crash
Point taken. If I crash, no one would know which is which to shut it off.
CCS/LRRS Expert#39, retired | Tony's Track Days, Instructor #11, retired
Thanks for posting this Chuck - this is something that I want to do as well.
One thought - did you consider putting the ign bypass and kill switch on a single, double pole-type switch (or wiring them in parallel through one SP switch)?.
I think this is what the PO of my bike did; I don't have an ign bypass switch, just a kill....
~Scott
2020 SMC-R
I could just do this, but I need to make sure that power doesn't leak to the tach at all when the bike is off.
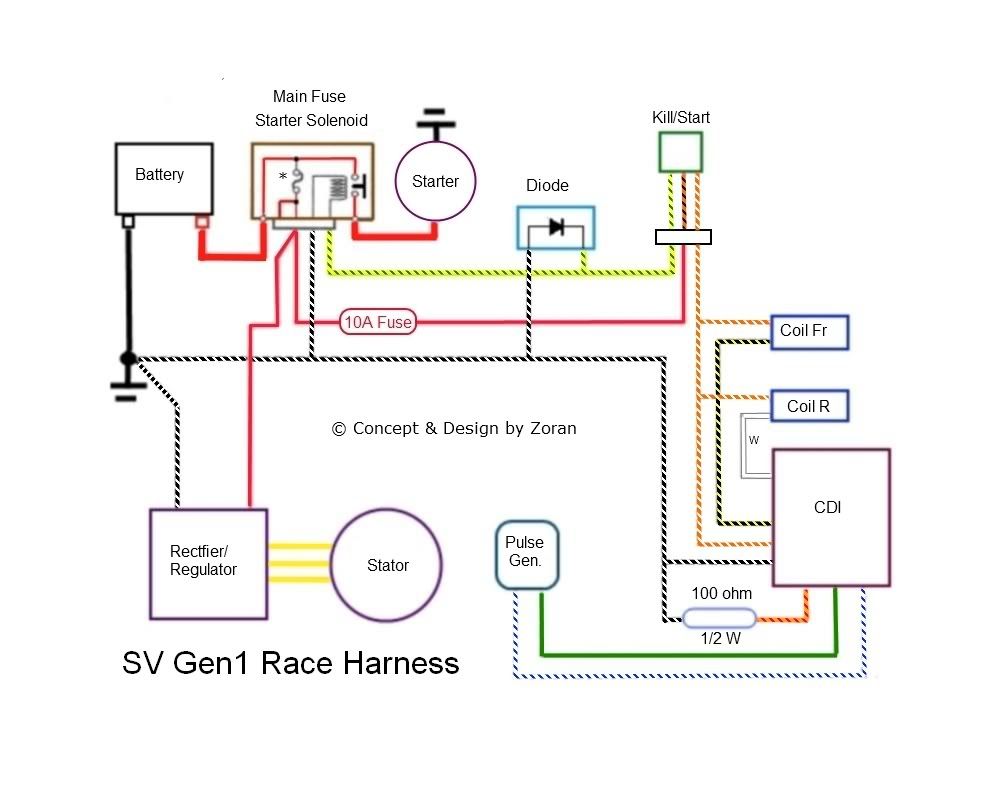
BTW, here is the full wiring diagram from Zoran, complete with the 100 pohm resistor:
CCS/LRRS Expert#39, retired | Tony's Track Days, Instructor #11, retired
So, new update, using a Magura Choke Lever I got for under $18, shipped, I was able to relocate the choke into this lever. The stock choke cable fit almost perfectly into the lever housing. It is now mounted on the left clip-on:
And I labeled the switches, in case a corner worker needs to know which is which:
The entire finished clip-on clean-up project:

CCS/LRRS Expert#39, retired | Tony's Track Days, Instructor #11, retired
looking good
LRRS Am #331
Graphic Tailor / Woodcraft / Armour Bodies / Suomy / Cycle Performance Autobody / Shorai / ChickenHawk Racing
Interesting project Chuckles, nice clean work =)
Oh and as for 1/5th or 1/4 throttle? It is an SV. I suggest you replace your throttle with this:
Its an SV, throttle modulation is for pussies :-p
oh, and I think mine is 1/5th :-p
LRRS/CCS EX #29
434Racer Performance Parts / Motul / Sportbike Track Gear / Knox / Dyno Solutions / Tony's Track Days / MTAG Pirelli / Nexx Helmets / Woodcraft / GMD Computrack
Wirelessly posted (Mozilla/5.0 (BlackBerry; U; BlackBerry 9930; en-US) AppleWebKit/534.11+ (KHTML, like Gecko) Version/7.0.0.374 Mobile Safari/534.11+)
Nice clean work Chuck. Never undersdtood the 1/5 turn throttle need though. All you're doing is lessening your fine control of the throttle.
Looks great!
Gino
HAWK GT Racer Expert #929
2012 CCS LRRS ULSB Champion
2012 CCS LRRS P89 Champion
2008 CCS ULSB National Champion
ECKRACING Bridgestone Street & Competition Woodcraft MOTUL On Track Media Pine Motorparts Vanson Leathers
 Posting Permissions


 Reply With Quote


