0


* please keep this thread on topic *
Work has been done in Degsy's garage this week to get my bike ready for PCIII tuning At RJ's Motorcycles on Saturday & for my long ass bike ride coming up in 2 weeks.
Day 1:
Started by taking off the tank mounted HyperPro damper, and lifting the tank.
Took out the air box and cleaned the K&N air filter
The motor didnt look at shiny as the chrome on the bike, but it's expected on a 6 year old bike with 20k+ miles
Next was new plugs. Took out the NGK 9E plugs and replaced them with NGK Iridium IX plugs. Below you can see how badly I needed this done.
Next was the new Gafler stainless brake lines and new DOT4 brake fluid (thanks GixerJockey).
now it's 1:30am and it's time to call it a day.
looking good let me know how the SS lines feel. with the map done i might ride behind you for once.
All strippers SHOULD have fake tits!
Day 2:
took this opportunity with the front end off to remove that pesky stock damper that everyone gives me crap about. It wasn't easy as Derek and Nate were there to give a hand & can tell you how frustrated I got getting this thing off.
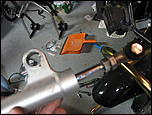
Tried to heat the bolt to use a striped bolt socket...FAIL
So we went to option B
[youtube]http://www.youtube.com/watch?v=ty6Gx11j4qo[/youtube]
Used a drummel to shave off the allen hex nut for the other bolt. then the drummel wheel was toast and couldnt find any new ones. Ended up resorting to a hammer and smashing the fugger off. damper is FINALLY off!!!
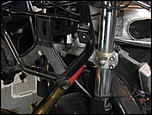
Time to tear down the entire front end to replace those steering head bearings. This part may help some if you, since there has been interest lately on the boards on how to replace these. R1slowflyer, this is for you
Removed the front end including the lower triple and forks.
now the upper triple, and jack the bike up by the headers
here's where all the bearings go. once the old racers go out, make sure to give it a good cleaning.
new bearing kit
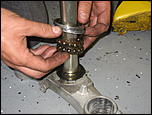
comparing the old vs the new
Derek's trick on installing these: put the new bearings int he freezer overnight. Heat up the old bearings for easier removal using a flat head screw driver and a hammer. NOTE: do not hammer your thumb multiple times. It hurts. *cough* Derek *cough*
take the new frozen bearings and they should drop right in the frame now that the heat expanded it. You will need to 'persuade' the new ones in to make it fit all the way in. We used a socket over the bearings and hammered them in.
top's done
repeat the same steps for the bottom part of the bearings.
take the bearings off the lower triple and replace them. This step we couldnt finish, since the bearing was on there so tight. We used heat and couldnt budge it. This part is getting brought to a place today for removal of the old and install the new bearings.
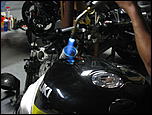
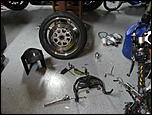
how the bike currently looks
plastics off to the side
front (chrome) wheel, fender, and fairing stay
now it's 1:00am and time to go home. Day 3 pictures tomorrow
i couldn't get the race off the stem either when I replaced my head bearings ... such a PITA
LRRS/CCS/WERA Expert 576
ECK-Racing 2009
Pine Motorparts/PBE Specialists | Phoenix Graphics | Woodcraft | Moon Performance | RJ's Motorsport | Motorcycles of Manchester | BostonMoto-Pirelli
http://www.saxmanracing.com
Jim, I am very impressed with you. And I thought the most you were capable of doing was putting air in the tires!
Just dont let Denno put the rear wheel on!! hehehe
If all else fails, Lean more....
or frame sliders. honestly who cuts the plastics, misses the spot. cuts another hole in the plastics on the same side. THEN realizes they're no-cut frame slidersOriginally Posted by brendanp

but ya, this bike should be all back together tonight, so i can tow it to NH tomorrow for my custom map

Fascinating pictorial. Ooh, an air filter. Ooh, spark plugs. Old AND new spark plugs. It doesn't get any better than this. But wait! Stainless lines in the packaging! Excitement!
Jim,
Degsy is doing everything and you're taking pics. Dont pawn it off as you know what the hell you're doing you waste of space. Eat my asshole Jim, eat my asshole.
When I need my chain or taint cleaned I'll give you a call
Best,
Denno
Denno - CCS|LRRS EX#49
2006 Yamaha R6LRRS Rookie of the Year 2008
Any comments about crashing ON THE RACETRACK are off limits to you until you pull the string on your manpon and do a trackday!:
LRRS/CCS Amateur #514 / RSP Racing / Woodcraft / MTAG Pirelli / Dyno Solutions / Tony's Track Days / Sport Bike Track Gear / 434racer / Brunetto T-Shirts / Knox / GMD Computrack
you're a bozo jim
Denno - CCS|LRRS EX#49
2006 Yamaha R6LRRS Rookie of the Year 2008
Yes... and, no...
Yes, I have changed my fair share of steering head bearings. Yes, they're always in there "tighter than a nine year old boy, fresh out of the orphanage".
No... I havn't had a really hard time. I have a 15 ton bearing press in the shop. It makes quick work out of bearing removal and installation.
LRRS/CCS Amateur #514 / RSP Racing / Woodcraft / MTAG Pirelli / Dyno Solutions / Tony's Track Days / Sport Bike Track Gear / 434racer / Brunetto T-Shirts / Knox / GMD Computrack
Noel, where's this orphanage you talk about?
Q
"Ami blaireau, comme t'es nul au cronos..."
"If your mom's got a schlong, run away, she's not your mom...."
That question disturbs even me... And I posted it.
I'm honestly starting to reconsider my accomodations down at VIR...
LRRS/CCS Amateur #514 / RSP Racing / Woodcraft / MTAG Pirelli / Dyno Solutions / Tony's Track Days / Sport Bike Track Gear / 434racer / Brunetto T-Shirts / Knox / GMD Computrack
BUY OUT!
Denno - CCS|LRRS EX#49
2006 Yamaha R6LRRS Rookie of the Year 2008
you'll bring more young boys or less young girls with you?
hahaha
Q
"Ami blaireau, comme t'es nul au cronos..."
"If your mom's got a schlong, run away, she's not your mom...."
buy out what???
LRRS/CCS Amateur #514 / RSP Racing / Woodcraft / MTAG Pirelli / Dyno Solutions / Tony's Track Days / Sport Bike Track Gear / 434racer / Brunetto T-Shirts / Knox / GMD Computrack
Jimthis is fucking terrible. Have I taught you nothing?
1. This is not a rebuild. This thread should be titled 'maintenance'.
2. Derek did all the work for you. He should be charging your ass labor fees.
3. Your pictures are poorly taken and NOWHERE near high enough resolution.
Zip-Tie Alley Racing
LRRS/CCS #103
PPS | Dunlop | Boston Moto | Woodcraft & Armour Bodies | 35 Motorsports | Pit Bull | K&N

LRRS/CCS Amateur #514 / RSP Racing / Woodcraft / MTAG Pirelli / Dyno Solutions / Tony's Track Days / Sport Bike Track Gear / 434racer / Brunetto T-Shirts / Knox / GMD Computrack
This is not a joking matter, Noel
Jim, please refer to my garage and bike build threads for proper technique on:
- Creating long build threads
- Multi-quoting like a champion
- Building low-ceiling garages
- Taking and posting high-resolution pictures
- Owning and maintaining a bike that isn't a chromed-out garage queen piece of junk
Have a nice day and fuck you very much.
Zip-Tie Alley Racing
LRRS/CCS #103
PPS | Dunlop | Boston Moto | Woodcraft & Armour Bodies | 35 Motorsports | Pit Bull | K&N
POW!
Denno - CCS|LRRS EX#49
2006 Yamaha R6LRRS Rookie of the Year 2008
 Posting Permissions

 Reply With Quote